Be sure to check out our Clothesline Guide for more information on clotheslines!
1. Choose two adjacent points that will provide enough space to hang your clothes. Try to
pick a spot that is relatively flat
and open.
2. Tools Needed – A hammer, Pencil, Drill, Socket, Wire cutters, Punch.

3.
|
Equipment Needed for Mounting into Wood |
|
Equipment Needed for Mounting into Brick or
Concrete
|
|
1 only ¼” Bit
|
1 only ½ ” Carbide Bit
|
|
4 only 5/16” x 2” lag bolts
|
4 only ¼” x 1 ½ ” lag shields (aka: lead shields)
|
|
4 only washers
|
4 only ¼” x 2” lag bolts
|
|
|
4 only washers
|
4. Depending on how you would like the elevator to operate,
choose either a comfortable position to hang your clothes or
the highest point you can reach. (Elevator should be mounted according to the reach of the user). The top of the elevator
has the wheel inside the bracket. Hold elevator against the wall or post and mark the bottom mounting points with a pencil
only. The elevator should be square, flat, level and center to opposite mounting point.

5. Now that you have marked the bottom part of the elevator, using a punch or nail make a hole at the pencil marks then
drill the ¼” inch holes.
6. Return the elevator to mounting holes.
7. Line up holes and use the two 5/16” x 2” lag bolts with washers.
8. Keeping your hand on the elevator at all times tighten lag bolts until snug.

9. Hold the elevator against the mounting post and using a ladder proceed carefully to the top of the elevator. Mark and
drill the two mounting holes with ¼ inch drill bit. Secure the top of the elevator with the two remaining lag bolts and
washers.
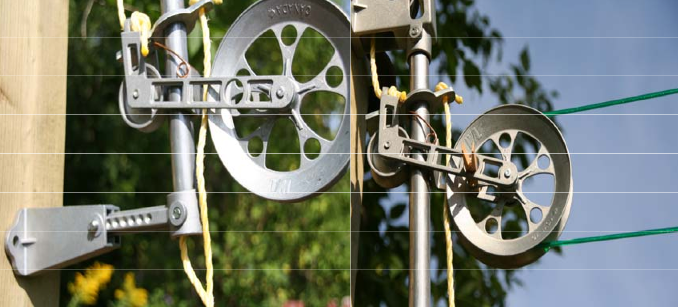
10. When mounting the opposing pulley make sure it is approximately two feet higher than the top of the elevator. This will
reduce the amount of sag.
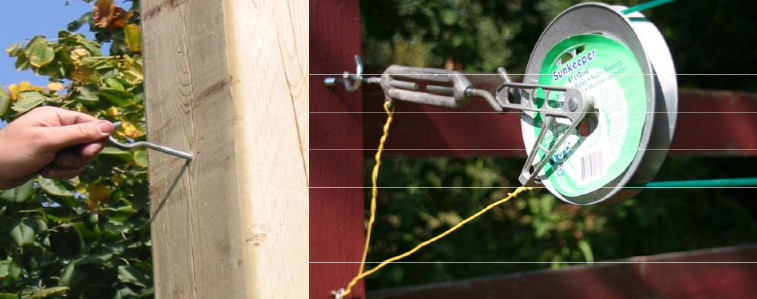
11. Screw in holding hook until secure. You can use just the hook with your Clothesline Pulley or attach it to a Clothesline Turnbuckle which will allow you to tighten the line when it
starts to sag. (Sag will occur naturally as the line stretches
with the extra weight of the clothes).
12. Attach a piece of single strand wire
through the lower eye hole to the post below the pulley. This will prevent the pulley
from twisting.
13. After installing the clothesline wire, tighten the line with
pulley on the elevator in the top position (highest). This will
insure the line is tight when the clothes are loaded and pulled to the top position.

14. Connect the clothesline wire with a Yellow Joiner, Mini Winch, or Joiner Tightener.
15. Before lowering the elevator pulley, partially unscrew the set screw on the adjustable bottom bracket so that the pipe
bracket will slide out of the wall bracket.
16. Lower pulley to bottom of the elevator, adjust pipe bracket and retighten the set screw. This allows the clothesline
elevator pulley to move up and down keeping the tension on the clothesline in both positions.
17. The Clothesline Spreader will hold the 2 lines together allowing the upper line to help support the weight on the lower
line. The Clothesline Spreader is placed on the clothesline after ½ the wash is hung. (More than one divider may be
necessary depending on the length of the line or the weight of the clothes).
18. Insert clothes pin into locking hole to stop the line from moving once clothes are hanging.
Post Installation
To
secure to a post will require 4 lag bolts which should measure a
minimum of 2” in length and a ¼” diameter. Some people have used u-bolts
to a steel post, but the steel post needs to be the same diameter as
the distance between the holes of the top and bottom brackets which are
both the same. The distance between both the top and bottom brackets is
2-1/2" from center to center to the holes on the opposite end so the
maximum pole diameter must be 2".